Appearance
Parameters Reference
Complete reference of all parameters in Despill Maestro.
Main Controls
Despill Amount
Range: 0-500% | Default: 100%
Controls the overall strength of spill removal. Values above 100% provide more aggressive removal for difficult footage.
- 0% - No spill removal
- 100% - Standard removal
- 200%+ - Aggressive removal for heavy spill
Despill Color
Options: Red | Green | Blue | Custom | Default: Green
Select which color to remove from your footage.
- Red - Remove red spill (for blue/green screen shots with red light contamination)
- Green - Remove green spill (standard green screen)
- Blue - Remove blue spill (standard blue screen)
- Custom - Target any specific color using the Custom Color picker
Custom Color
Type: Color Picker | Default: RGB(70, 150, 70)
When Despill Color is set to Custom, use this to select the exact color you want to remove. Useful for non-standard backgrounds or specific color contamination.
Spill Refinement Group
Algorithm
Options: 10 algorithms | Default: Channel Average
Choose the spill detection method. Different algorithms work better for different types of footage.
Available Algorithms:
- Channel Average - Best general-purpose algorithm
- Largest Channel - Simple and effective for clean footage
- Smallest Channel - Alternative approach for difficult spill
- Spill Color Limited by Red - Preserves red channel (good for skin tones)
- Spill Color Limited by Green - Preserves green channel
- Spill Color Limited by Blue - Preserves blue channel
- Limit Spill Color to 90% of Red - More aggressive red preservation
- Limit to Exceed Channel Avg by 10% - Conservative removal
- Double Green/Blue Average - Enhanced chroma preservation
- Double Red Average - Best for preserving skin tones
See detailed algorithm explanations
Channel Bias
Range: 0-100% | Default: 50%
Only available for algorithms that use averaging (Channel Average, Exceed Channel Avg by 10%). Adjusts the weight given to reference channels when detecting spill.
- 0% - Favor first reference channel
- 50% - Equal weighting
- 100% - Favor second reference channel
Expansion
Range: 0-200% | Default: 0%
Expands the spill detection area by lowering the threshold. Higher values detect more spill but may affect colors that aren't actually spilled.
Use when spill removal is too subtle or missing edge contamination.
Softness
Range: 0-200% | Default: 0%
Controls the falloff curve of spill removal. Higher values create a gentler transition between removed and preserved areas.
- 0% - Sharp, linear removal
- 50% - Moderate softening
- 100%+ - Very gradual transition
Desaturation
Range: 0-100% | Default: 0%
Pushes despilled areas toward grayscale based on luminance. Helps eliminate residual color tints after spill removal.
The effect is strongest where spill was detected and smoothly transitions at edges to avoid visible seams.
Color Replace Group
When enabled, replaces removed spill with a custom color instead of just removing it.
Enable Color Replace
Type: Checkbox | Default: Off
Activates color replacement mode. Useful for adding color back to areas that become too desaturated after spill removal.
Replacement Color
Type: Color Picker | Default: RGB(128, 128, 128)
The color that will replace the removed spill. Neutral gray (128, 128, 128) is often a good starting point.
Color Strength
Range: 0-100% | Default: 100%
Controls how much of the replacement color is blended into the despilled areas.
- 0% - No color replacement
- 50% - Partial replacement
- 100% - Full replacement
Luma Correction
Range: 0-200% | Default: 0%
Adjusts the luminance of the replacement color to better match the original pixel brightness. Prevents darkening or lightening when adding replacement color.
Clamp 32-bit
Type: Checkbox | Default: Off
When working in 32-bit float, enabling this prevents color replacement from creating values outside the 0-1 range. Useful for avoiding unexpected results in HDR workflows.
Protection Group
Protect specific colors from being affected by spill removal. Perfect for preserving skin tones, wardrobe colors, or other important elements.
Enable Protection
Type: Checkbox | Default: Off
Activates the color protection system.
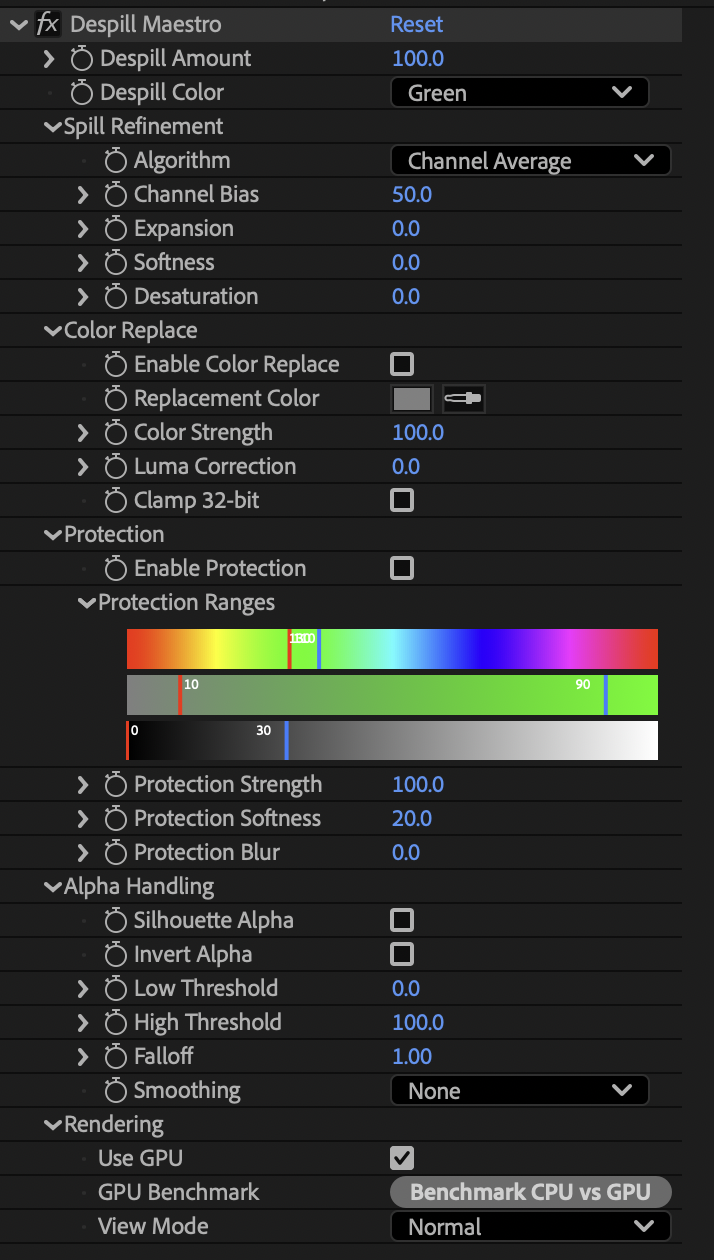
Protection Ranges
Type: Interactive Gradient UI
Visual interface showing three gradient bars for Luma, Hue, and Saturation ranges. Pixels that fall within ALL three ranges will be protected from despill.
The ranges are defined by the following parameters (typically controlled via the gradient UI):
- Luma Range: 0-100% (Default: 0-30%)
- Hue Range: 0-360° (Default: 110-130° for green screen)
- Saturation Range: 0-100% (Default: 10-90%)
Common Protection Range Presets:
| Use Case | Hue Range | Saturation Range | Luma Range |
|---|---|---|---|
| Skin Tones | 0-30° (red/orange) | 20-80% | 20-80% |
| Blue Wardrobe | 180-240° (blue/cyan) | 30-90% | 20-80% |
| Red Wardrobe | 340-20° (red) | 40-90% | 20-80% |
| Foliage/Plants | 90-150° (green/yellow-green) | 30-90% | 15-70% |
Tips:
- Narrow ranges provide precise protection but may miss variations
- Wider ranges protect more but may shield actual spill
- Use View Mode: Protection Mask to visualize what's being protected
Protection Strength
Range: 0-100% | Default: 100%
Controls how much protection is applied to colors within the defined ranges.
- 0% - No protection (despill affects all colors)
- 50% - Partial protection
- 100% - Full protection (no despill on protected colors)
Protection Softness
Range: 0-100% | Default: 20%
Feathers the edges of the protection mask for gradual transitions.
- 0% - Hard edges on protection mask
- 50% - Smooth transitions
- 100% - Very soft, gradual protection
Protection Blur
Range: 0-100 pixels | Default: 0
Applies Gaussian blur to the protection mask. Useful for creating smoother, more organic protection areas.
Note: Higher values increase render time but produce softer results.
Alpha Handling Group
Controls for generating and modifying the alpha channel based on spill removal.
Silhouette Alpha
Type: Checkbox | Default: Off
When enabled, multiplies the alpha channel by the spill amount, creating a matte from the despill operation. Areas with more spill become more transparent.
Use cases:
- Creating holdout mattes
- Edge refinement
- Generating garbage mattes from spill
Invert Alpha
Type: Checkbox | Default: Off
Inverts the alpha channel after all other operations. Useful when you need the opposite of the generated matte.
Low Threshold
Range: 0-100% | Default: 0%
Black point for alpha levels adjustment. Pixels with alpha below this value become fully transparent.
High Threshold
Range: 0-100% | Default: 100%
White point for alpha levels adjustment. Pixels with alpha above this value become fully opaque.
Note: Together, Low and High Threshold work like levels adjustment for the alpha channel.
Falloff
Range: 0.1-4.0 | Default: 1.0
Applies a power curve to the alpha channel.
- < 1.0 - Expands the alpha (makes more areas opaque)
- 1.0 - No curve applied
- > 1.0 - Contracts the alpha (makes more areas transparent)
Alpha Smoothing
Options: None | Smooth | Smoother | Smoothest | Default: None
Applies different smoothing curves to the alpha channel for softer edges:
- None - Linear alpha
- Smooth - Smoothstep curve
- Smoother - Smootherstep curve
- Smoothest - Double smoothstep curve
Each level provides progressively softer, more organic edges.
View Modes
View Mode
Options: Normal | Spill Map | Alpha | Protection Mask | Default: Normal
Change what the plugin displays for visualization and troubleshooting:
- Normal - Standard output with despilled colors and processed alpha
- Spill Map - Grayscale visualization of detected spill amount (white = more spill)
- Alpha - Shows the alpha channel as grayscale
- Protection Mask - Displays the protection mask (white = protected, black = not protected)
Workflow Tips:
- Use Spill Map to fine-tune Algorithm, Expansion, and Softness
- Use Protection Mask to adjust protection ranges
- Use Alpha when working with Silhouette Alpha settings
Rendering Group
Use GPU
Type: Checkbox | Default: Auto-detected
Enables GPU-accelerated processing when available. The plugin automatically detects GPU capabilities on startup.
- On - Use GPU acceleration (if available)
- Off - Use multi-threaded CPU processing
Performance: GPU acceleration can be 2-10x faster than CPU, depending on your hardware and footage resolution.
Benchmark Tool
Type: Button
Runs a performance comparison between CPU and GPU rendering paths. Displays processing times in the After Effects info panel.
Use this to determine if GPU acceleration is beneficial for your specific setup and footage.
Need workflow guidance? Check out the User Guide for step-by-step instructions.
Want technical details on algorithms? Visit the Spill Algorithms page.